6장. Snakemake를 이용한 워크플로우 관리
6.1 워크플로우란?
생명정보학 분석은 보통 여러 단계를 순서대로 수행한다. 예를 들어 RNA-seq 분석은 다음과 같은 흐름을 따른다:
- FASTQ 파일 품질 확인 (FastQC)
- 어댑터 트리밍 (Trim Galore)
- 레퍼런스 게놈에 정렬 (STAR)
- 발현량 정량 (featureCounts)
- 차등 발현 분석 (DESeq2)
이 과정을 매번 수동으로 실행하면 시간이 오래 걸리고, 실수가 생기기 쉽다. Snakemake는 이러한 분석 파이프라인을 자동화하는 워크플로우 관리 도구이다.
Snakemake의 장점
- 재현성: 같은 Snakefile로 언제든 동일한 분석을 반복할 수 있다
- 자동 의존성 관리: 어떤 단계를 먼저 실행해야 하는지 자동으로 판단한다
- 병렬 실행: 독립적인 단계는 동시에 실행하여 시간을 절약한다
- 부분 재실행: 중간에 실패하면 실패한 단계부터 다시 시작한다
6.2 설치
pip install snakemake참고: 복잡한 생명정보학 파이프라인에서는 Conda와 함께 사용하는 것이 일반적이다. 각 rule에 독립적인 Conda 환경을 지정할 수 있다.
6.3 Snakemake 핵심 개념
Rule (규칙)
Snakemake의 기본 단위는 rule이다. 하나의 rule은 입력 → 처리 → 출력을 정의한다.
rule fastqc:
    input:
        "data/{sample}.fastq.gz"
    output:
        "results/fastqc/{sample}_fastqc.html"
    shell:
        "fastqc {input} -o results/fastqc/"
Wildcard (와일드카드)
{sample} 같은 와일드카드를 사용하면 여러 샘플에 같은 규칙을 자동 적용할 수 있다. 예를 들어 sample_A.fastq.gz, sample_B.fastq.gz, sample_C.fastq.gz가 있으면, 위 rule이 세 파일 모두에 자동으로 실행된다.
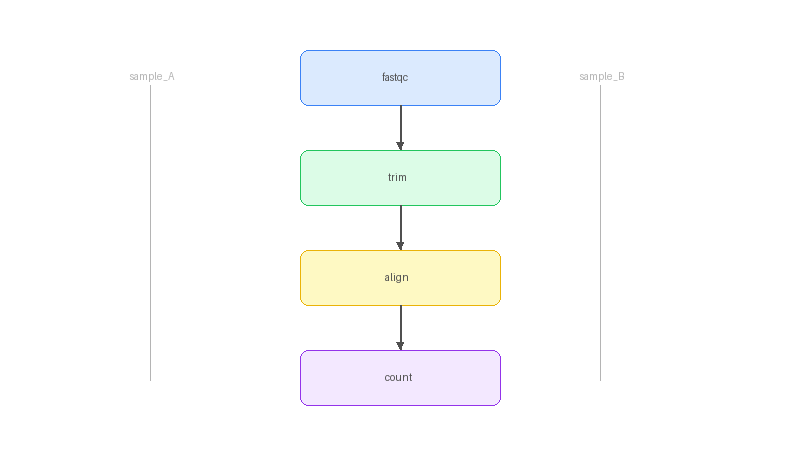
DAG (방향성 비순환 그래프)
Snakemake는 rule 간의 의존 관계를 DAG로 자동 구성한다. 출력 파일이 다른 rule의 입력 파일이면 자동으로 순서가 결정된다.
6.4 Snakefile 작성
기본 구조
Snakefile은 프로젝트 루트에 Snakefile이라는 이름으로 작성한다. rule all은 최종적으로 원하는 결과 파일을 지정하는 특수 rule이다.
# 샘플 목록 정의
SAMPLES = ["sample_A", "sample_B", "sample_C"]

# 최종 목표 지정
rule all:
    input:
        expand("results/counts/{sample}.counts.txt", sample=SAMPLES)

# 1단계: 품질 확인
rule fastqc:
    input:
        "data/{sample}.fastq.gz"
    output:
        "results/fastqc/{sample}_fastqc.html"
    shell:
        "fastqc {input} -o results/fastqc/"

# 2단계: 트리밍
rule trim:
    input:
        "data/{sample}.fastq.gz"
    output:
        "results/trimmed/{sample}_trimmed.fastq.gz"
    shell:
        "trim_galore {input} -o results/trimmed/"

# 3단계: 정렬
rule align:
    input:
        fastq="results/trimmed/{sample}_trimmed.fastq.gz",
        index="ref/genome_index"
    output:
        "results/aligned/{sample}.bam"
    threads: 4
    shell:
        "STAR --runThreadN {threads} "
        "--genomeDir {input.index} "
        "--readFilesIn {input.fastq} "
        "--outSAMtype BAM SortedByCoordinate "
        "--outFileNamePrefix results/aligned/{wildcards.sample}"

# 4단계: 발현량 정량
rule count:
    input:
        bam="results/aligned/{sample}.bam",
        gtf="ref/genes.gtf"
    output:
        "results/counts/{sample}.counts.txt"
    shell:
        "featureCounts -a {input.gtf} -o {output} {input.bam}"
실행
# 드라이런 (실제 실행 없이 계획 확인)
snakemake -n

# 실행 (4개 작업 병렬)
snakemake --cores 4

# DAG 시각화
snakemake --dag | dot -Tpng > dag.png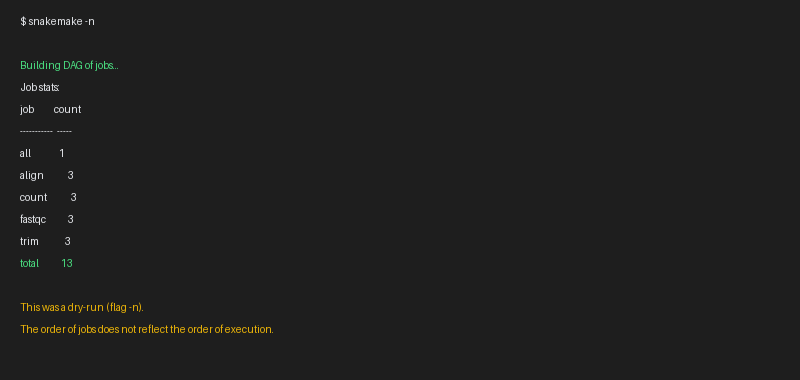
6.5 주요 기능
Conda 환경 통합
각 rule에 독립적인 Conda 환경을 지정할 수 있다. 도구 간 의존성 충돌을 방지한다.
rule deseq2:
    input:
        counts=expand("results/counts/{sample}.counts.txt", sample=SAMPLES)
    output:
        "results/deseq2/results.csv"
    conda:
        "envs/deseq2.yaml"
    script:
        "scripts/deseq2.R"
# envs/deseq2.yaml
name: deseq2
channels:
- conda-forge
- bioconda
dependencies:
- r-base=4.3
- bioconductor-deseq2Config 파일
분석 파라미터를 Snakefile과 분리하여 관리할 수 있다.
# config.yaml
samples:
  - sample_A
  - sample_B
  - sample_C

reference:
  genome: "ref/genome.fa"
  gtf: "ref/genes.gtf"

params:
  threads: 4
  min_quality: 20
# Snakefile에서 config 사용
configfile: "config.yaml"
SAMPLES = config["samples"]
rule trim:
input:
"data/{sample}.fastq.gz"
output:
"results/trimmed/{sample}_trimmed.fastq.gz"
params:
quality=config["params"]["min_quality"]
shell:
"trim_galore -q {params.quality} {input} -o results/trimmed/"로그 파일
각 rule의 실행 로그를 별도로 저장한다.
rule align:
    input:
        "results/trimmed/{sample}_trimmed.fastq.gz"
    output:
        "results/aligned/{sample}.bam"
    log:
        "logs/align/{sample}.log"
    shell:
        "STAR --readFilesIn {input} > {log} 2>&1"
6.6 바이브 코딩으로 Snakefile 작성하기
Snakemake의 문법을 완벽하게 익히는 것보다, 분석 파이프라인의 흐름을 이해하고 AI에게 정확히 설명하는 것이 중요하다.
AI에게 요청하는 예시
“RNA-seq 파이프라인을 Snakemake로 만들어줘. 입력은 data/ 폴더의 FASTQ 파일이고, FastQC → Trim Galore → STAR 정렬 → featureCounts 순서로 처리해줘. 샘플 목록은 config.yaml에서 읽어오게 하고, 각 단계마다 로그 파일을 남겨줘”
이 요청을 하려면 다음을 알아야 한다:
- 분석 단계의 순서: 왜 트리밍 다음에 정렬을 하는지
- 각 도구의 역할: FastQC는 QC, STAR는 정렬, featureCounts는 정량
- 입출력 파일 형식: FASTQ → BAM → counts
Snakefile 수정 요청 예시
“align rule에서 STAR 대신 HISAT2를 사용하도록 바꿔줘”
“count rule 다음에 DESeq2로 차등 발현 분석하는 rule 추가해줘. R 스크립트는 별도 파일로 분리하고, Conda 환경도 만들어줘”
“sample_D가 추가됐으니까 config.yaml에 반영해줘”
디버깅 요청 예시
“snakemake 실행하면 align 단계에서 에러가 나. logs/align/sample_A.log 보고 원인 알려줘”
“드라이런 결과를 보여주고, DAG 그래프도 생성해줘”
6.7 실전: 단일세포 분석 파이프라인
Scanpy 분석도 Snakemake로 자동화할 수 있다:
SAMPLES = ["pbmc_10k", "pbmc_5k"]

rule all:
    input:
        expand("results/{sample}/umap.png", sample=SAMPLES)

rule qc:
    input:
        "data/{sample}.h5ad"
    output:
        "results/{sample}/qc_filtered.h5ad"
    script:
        "scripts/01_qc.py"

rule normalize:
    input:
        "results/{sample}/qc_filtered.h5ad"
    output:
        "results/{sample}/normalized.h5ad"
    script:
        "scripts/02_normalize.py"

rule cluster:
    input:
        "results/{sample}/normalized.h5ad"
    output:
        "results/{sample}/clustered.h5ad",
        "results/{sample}/umap.png"
    script:
"scripts/03_cluster.py"팁: AI에게 “이 Scanpy 분석을 Snakemake 파이프라인으로 변환해줘”라고 요청하면, 기존 분석 코드를 자동으로 rule 단위로 분리하고 Snakefile을 생성해준다.
6.8 정리
- Snakemake: 생명정보학 분석 파이프라인을 자동화하는 워크플로우 관리 도구
- Rule: 입력 → 처리 → 출력을 정의하는 기본 단위
- Wildcard:
{sample}같은 패턴으로 여러 샘플에 동일 규칙 적용 - DAG: rule 간 의존 관계를 자동으로 파악하여 실행 순서 결정
- Config 파일: 분석 파라미터를 Snakefile과 분리하여 관리
- 바이브 코딩의 핵심: 분석 파이프라인의 흐름과 각 도구의 역할을 이해하고, AI에게 단계별로 지시하는 것